Active Directory – finding the tombstone lifetime

One of the things that impact the validity of a backup is the tombstone lifetime.

To find it quickly we can use Powershell and run the below:

 (get-adobject "cn=Directory Service,cn=Windows NT,cn=Services,cn=Configuration,dc=windowsrockstar,DC=com" -properties "tombstonelifetime").tombstonelifetime

This will return the answer in days. By default it will be 180 days if your forest started in Windows Server 2008. It will be 60 days or no result (which means 60 days) if your forest started in Windows 2000 or 2003

tombstone lifetime

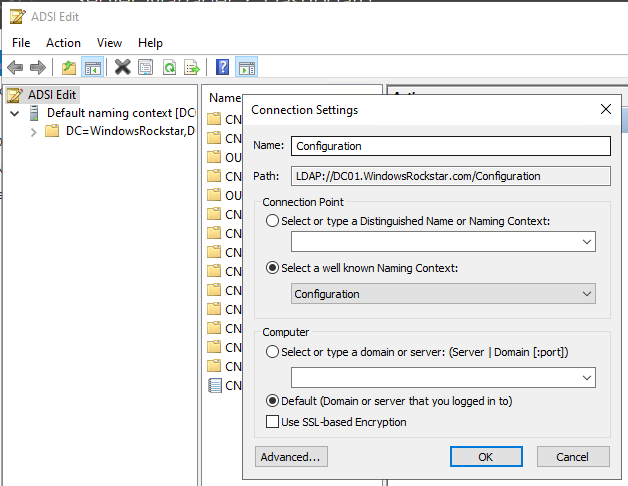
There is also a GUI way of doing it by using ADSI Edit.

In the Connection Point section, select the Select a well known Naming Context radio button and select Configuration from the dropdown list.

ADSI Edit configuration naming context

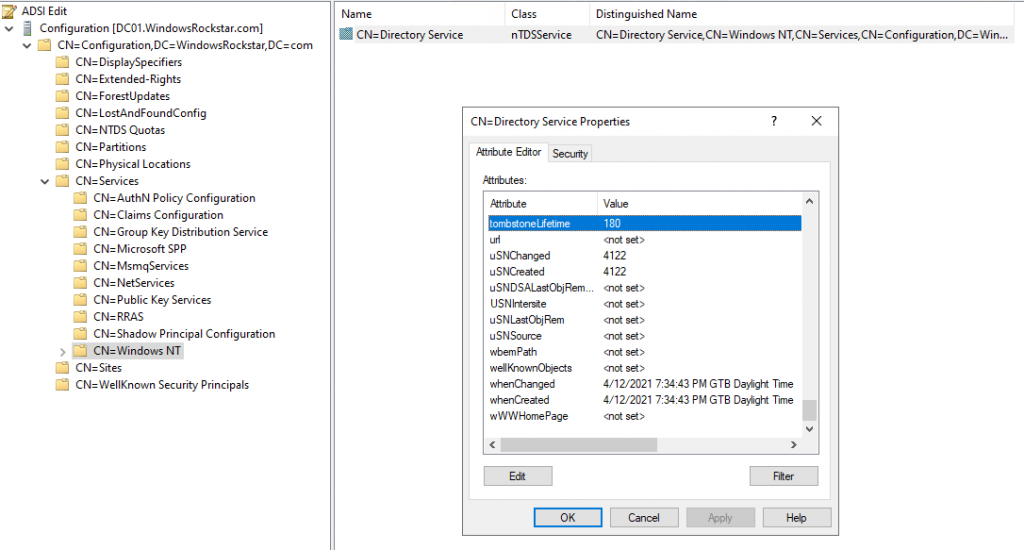
Expand Configuration; CN=Configuration,DC=; CN=Services; and CN=Windows NT. Then right click on CN=Directory Service and select Properties.
In the Attribute Editor tab of the properties window, locate the tombstoneLifetime. The value of this attribute represents the forest’s current tombstone lifetime in days. If the attribute’s value shows <not set>, the tombstone lifetime of the forest is 60 days.

Tombstone lifetime – adsi edit

If you want to change the tombstone lifetime you can edit the attribute and set it to desired value in days.

If you want to change the value of tombstone lifetime with Powershell you can use the below code:

(Set-adobject -Server DCNAME  “cn=Directory Service,cn=Windows NT,cn=Services,cn=Configuration,dc=domainname,dc=domainsuffix” -Replace @{‘tombstonelifetime’=”240″})

Don’t forget that how long you can use your Active Directory backup depends on the tombstone lifetime.

Schedule server reboot via Task Scheduler

Sometimes we need to schedule the reboot of a server after hours.

We can do this very easy with Task scheduler and PowerShell.

Open Task Scheduler and create a new basic task. Give it a meaningful name:

image

And press Next.

Set it to One time and press Next:

image

Set the date and time for the reboot, then press Next:

image

Choose Start a program, then press Next:

image

On the program name put Powershell and for the arguments put restart-computer –force, then press Next:

image

Press Finish:

image

After that the task is created, but it will not run if we logoff from the server:

image

Now we need to edit the task and make it run even if the user is not logged on and with highest privileges:

image

Press OK.

Enter your user and password, then press OK:

image

The task is now set and will reboot the server at the given time.

image

Enjoy your time and the server will reboot itself.

If you need to send a email prior to the reboot I have an article about this here.

Hyper-V Updating Integration components for Windows Server 2016

The way to do things before was painful – you had to use Windows Update to update the VMGuest.ISO which then you had to mount inside the guest and run the update from the VMGuest.ISO and reboot the VM. This had to be done manually on each VM.

You could use System Center Virtual Machine Manager (SCVMM) which allowed for batch reboots.

In Windows Server 2016 things have changed for the better – Windows Update will automatically update the integration components inside the VM if you are running any of the OSes below:

  • Windows Server 2016
  • Windows 10
  • Windows Server 2012 R2
  • Windows 8.1

If you are running an older OS like below you need to enable the Data Exchange Integration service and make sure it is running:

  • Windows Server 2012
  • Windows 8
  • Windows 7
  • Windows Vista SP2

But now we have another scenario – what if I live migrated my VMs from Windows Server 2012 /2012 R2 to Windows Server 2016? Will Windows update work from the start ? Well, not really. So what we need to do is to update manually the integration services by downloading the latest version of the integration services as a cab file from the Microsoft Download Center here: https://support.microsoft.com/en-us/help/3071740/hyper-v-integration-components-update-for-windows-virtual-machines-tha and run a PowerShell cmdlet:

Add-WindowsPackage -Online –PackagePath <path to .CAB file>

This can now be automated via Powershell to be done in batches on all VMs.

PowerShell – Finding AV definitions update for McAfee

I had a customer where we had to find which is the last update time of the AV definitions files for the McAfee but did not had access to the orchestrator console.

The script will read the the AVDatVersion and AVDatDate from the registry and write it which then can be passed to a monitoring tool for alerting.

 ######################################################
#
# NAME: Get-AVStatus.ps1
#
# AUTHOR: Alin Daniel Stanciu
#
# COMMENT: Script to check the last update for McAfee antivirus by reading the registry
# keys and taking the last DAT version and DAT date
# In order to also check for services status uncomment last line
#
# VERSION HISTORY:
# 1.0 10.09.2017 – Initial release
# 2.0 21.09.2017 – Stable Version for production usage
# USAGE: get-avstatus.ps1 -computername Localhost
#
########################################################
#force the computername as a parameter of the script
param (
[parameter(mandatory=$true)][string]$computername
)
try {
#Set up the key that needs to be accessed and what registry tree it is under
$key = „Software\McAfee\AVEngine”
$type = [Microsoft.Win32.RegistryHive]::LocalMachine
#open up the registry on the remote machine and read out the TOE related registry values
$regkey = [Microsoft.win32.registrykey]::OpenRemoteBaseKey($type,$server)
$regkey = $regkey.opensubkey($key)
$status = $regkey.getvalue(„AVDatVersion”)
$datdate = $regkey.getvalue(„AVDatDate”)
}
catch {
try {
$key = „Software\Wow6432Node\McAfee\AVEngine”
$type = [Microsoft.Win32.RegistryHive]::LocalMachine
#open up the registry on the remote machine and read out the TOE related registry values
$regkey = [Microsoft.win32.registrykey]::OpenRemoteBaseKey($type,$server)
$regkey = $regkey.opensubkey($key)
$status = $regkey.getvalue(„AVDatVersion”)
$datdate = $regkey.getvalue(„AVDatDate”)
}
catch {
$status = „Cannot read regkey”
}
}
New-Object PSobject -Property @{
Computername = $computername
DATVersion = $status
DatDate = $datdate
} |select Computername,DatVersion,DatDate 

PowerShell – getting system uptime in human readable format

In order to get the system uptime in the format No Days No Hours No Minutes we use the below script:

######################################################
#
# NAME: Get-SyatemUptime.ps1
#
# AUTHOR: Alin Daniel Stanciu
#
# COMMENT: Script to check the last update for McAfee antivirus by reading the registry
# keys and taking the last DAT version and DAT date
# In order to also check for services status uncomment last line
#
# VERSION HISTORY:
# 1.0 09 november 2017 – Initial release
# USAGE: get-systemuptime.ps1
########################################################
$OS = Get-WmiObject win32_operatingsystem
$BootTime = $OS.ConvertToDateTime($OS.LastBootUpTime)
$enddate=(Get-Date)
$diff=(NEW-TIMESPAN –Start $boottime –End $EndDate)
write-host $diff.days Days $diff.Hours Hours $diff.Minutes Minutes

The result is like this: 21 Days 21 Hours 56 Minutes.

Enjoy!

PowerShell – Send reboot notification email via a scheduled task

I needed to be able to send an email 24 hours before a server is rebooted via a scheduled task.

In order to achieve this I have a task that will reboot the server called „Computer reboot for updates”. The below script gathers the Next Run time of the scheduled task for the server reboot and then sends an email with that information.

#Destination email
$To = "john.doe@nodomain.com"

#Sender email
$From = "it@nodomain.com"

#SMTP server used
$SMTPServer = "0.0.0.0"

#name of the scheduled task for reboots
$taskname = "Computer reboot for updates"

#getting the reboot time from the task details
$rebootime = $((Get-ScheduledTask -TaskName $taskname | Get-ScheduledTaskInfo).NextRunTime)

#Building the email
$messageParameters = @{
Subject = "$env:ComputerName.$env:USERDNSDOMAIN Will be REBOOTED on $rebootime"
Body = "Server $env:ComputerName.$env:USERDNSDOMAIN Will be REBOOTED on $rebootime in order to apply the Windows Updates. Thank you, IT Team"
from = $From
To = $To
SmtpServer = $SMTPServer
}

#Sending the email
Send-MailMessage @messageParameters -BodyAsHtml

The result is an email like below:
From: it@nodomain.com
To: john.doe@nodomain.com
Subject: Test.domain.com Will be REBOOTED on 11/30/2017 06:00:00
Body: Server test.domain.com Will be REBOOTED on 11/30/2017 06:00:00 in order to apply the Windows Updates. Thank you, IT Team