What is the tombstone lifetime ?

This is quite a hot question that I get a lot when delivering trainings or helping customers. While most of them know the value, what actually is they do not know.
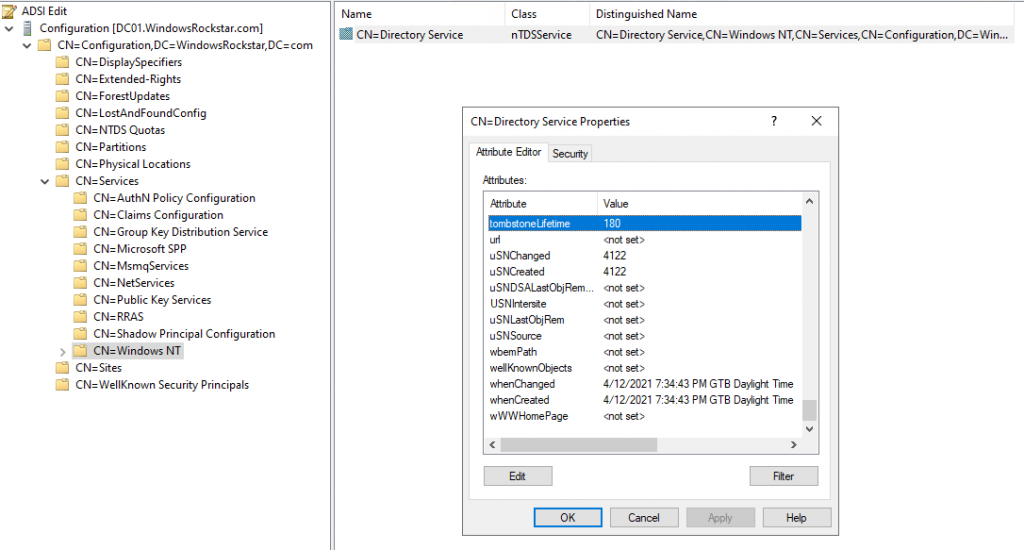
The Tombstone Lifetime is an attribute of the Directory Services object which can be found with ADSI Edit here: CN=Directory Service,CN=Windows NT,CN=Services,CN=Configuration,DC=WindowsRockstar,DC=com.

The attribute by default can have 2 values, depending on the OS version that was used when the forest was initially deployed.
It can have no value – this translates to the fact that the forest was started in Windows Server 2000, Windows Server 2003 or Windows Server 2008. This means the Tombstone Lifetime is 60 days.
Starting with Windows Server 2008 R2 the value of the Tombstone Lifetime attribute is 180 days.

The minimum value that we can set the Tombstone Lifetime to is 2 days. If we set it to less it will default to 60 days ( Windows Server 2000, Windows Server 2003 or Windows Server 2008) or 2 days starting with Windows Server 2008 R2 and later.

Below you have an image with the default value in Windows Server 2022

Tombstone Lifetime

Finding out the tombstone lifetime is easy and I wrote about it here.

The tombstone lifetime will influence how long we can use the Active Directory backup and how long an object will remain in recycled or deleted state. About this in a future article.

Active Directory – finding the tombstone lifetime

One of the things that impact the validity of a backup is the tombstone lifetime.

To find it quickly we can use Powershell and run the below:

 (get-adobject "cn=Directory Service,cn=Windows NT,cn=Services,cn=Configuration,dc=windowsrockstar,DC=com" -properties "tombstonelifetime").tombstonelifetime

This will return the answer in days. By default it will be 180 days if your forest started in Windows Server 2008. It will be 60 days or no result (which means 60 days) if your forest started in Windows 2000 or 2003

tombstone lifetime

There is also a GUI way of doing it by using ADSI Edit.

In the Connection Point section, select the Select a well known Naming Context radio button and select Configuration from the dropdown list.

ADSI Edit configuration naming context

Expand Configuration; CN=Configuration,DC=; CN=Services; and CN=Windows NT. Then right click on CN=Directory Service and select Properties.
In the Attribute Editor tab of the properties window, locate the tombstoneLifetime. The value of this attribute represents the forest’s current tombstone lifetime in days. If the attribute’s value shows <not set>, the tombstone lifetime of the forest is 60 days.

Tombstone lifetime – adsi edit

If you want to change the tombstone lifetime you can edit the attribute and set it to desired value in days.

If you want to change the value of tombstone lifetime with Powershell you can use the below code:

(Set-adobject -Server DCNAME  “cn=Directory Service,cn=Windows NT,cn=Services,cn=Configuration,dc=domainname,dc=domainsuffix” -Replace @{‘tombstonelifetime’=”240″})

Don’t forget that how long you can use your Active Directory backup depends on the tombstone lifetime.

How long can I use my Active Directory Backup

During my daily work I encounter a lot of confusion about this topic.

Let’s first discuss couple of basic things about the backup of Active Directory and why it is so important to use a Microsoft supported solution.

When we are in a Disaster Recovery scenario and we need to restore our Active Directory forest we want to know that we can rely on Microsoft for help. In order to be able to do this we need to use a supported solution which is Windows Server backup.

What is the first step in our Disaster Recovery process?

Document your infrastructure! Document your topology!

What should we document?

  • The forest name
  • All domain names (root and child domain names, including NETBIOS name)
  • Domain Controller names, IP addresses, gateway, DNS settings, VLAN
  • What Site my domain controller is in?
  • The sites topology, site links, replication schedules, connection objects (aka replication topology)
  • Owner of the FSMO roles
  • What kind of backup we are taking from that Domain Controller? (Full Server Backup, System state, Bare metal ?)
  • What hardware I am running on ?
  • What virtualization platform I am using?

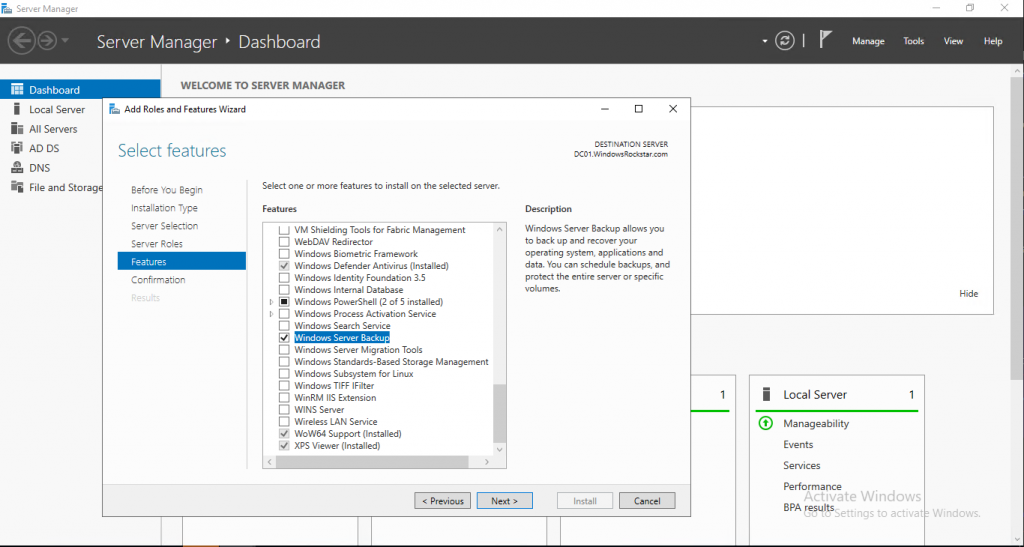
The next step is to take a proper backup. Modern Windows Server backup operating systems are not coming with Windows Server Backup installed by default, so the first thing would be to install it. To do that you need to go to Server Manager, Manage, add Roles and Features, go to features and select Windows Server backup, then install it.

After you install it go to Server Manager, Tools and Windows Server Backup

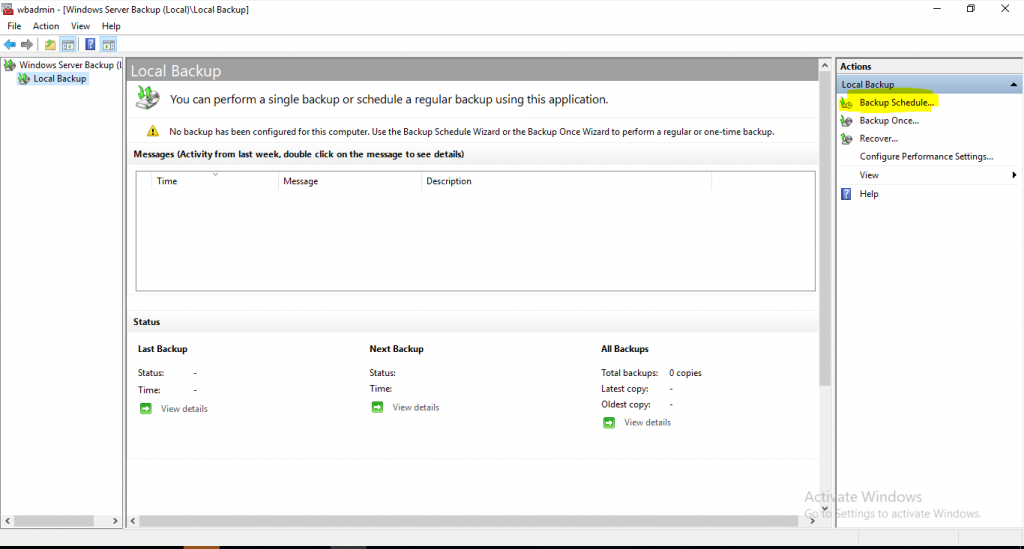
After Windows Server Backup has started, clock on Local Backup then go on the right side to Backup Schedule.

After the wizard starts click on Next, then you have two options: Full Server (recommended) or Custom.

If we select Full Server then all the needed data will be backed up, including Bare Metal recovery, System State, Recovery partition, and the content of the disk drives.

If we select Custom then we need to go click on Add items

Then the selection part opens

What should we backup from here? The answer is: it depends. If we want to be able to perform a full forest recovery then we should backup everything (at least Bare Metal recovery, System State, recovery partition and the C: Drive). If we want to perform a non-authoritative restore of Active Directory we can backup the System State.

After we decide what to backup we need to decide where we will point the backup – dedicated disk, a volume or a network share. Microsoft’s recommendation is to backup to a dedicated disk.

I will backup the full server to a disk.

After clicking Finish the disk will be formatted and will be used for the backup.

The backup will run as scheduled.

To answer the question: How long can I use my Active Directory backup? The answer is for: the duration of your Tombstone Lifetime setting. If your forest was started back in the 2003 days or older the default setting will be 60 days, starting with Windows Server 2008 R2 is 180 days.

So the answer will be: for 60 or 180 days from the moment you took your backup, depending on your tombstone lifetime!

I will discuss about the tombstone lifetime in a different article.

Schedule server reboot via Task Scheduler

Sometimes we need to schedule the reboot of a server after hours.

We can do this very easy with Task scheduler and PowerShell.

Open Task Scheduler and create a new basic task. Give it a meaningful name:

image

And press Next.

Set it to One time and press Next:

image

Set the date and time for the reboot, then press Next:

image

Choose Start a program, then press Next:

image

On the program name put Powershell and for the arguments put restart-computer –force, then press Next:

image

Press Finish:

image

After that the task is created, but it will not run if we logoff from the server:

image

Now we need to edit the task and make it run even if the user is not logged on and with highest privileges:

image

Press OK.

Enter your user and password, then press OK:

image

The task is now set and will reboot the server at the given time.

image

Enjoy your time and the server will reboot itself.

If you need to send a email prior to the reboot I have an article about this here.

Azure Site to Site VPN without dedicated VPN hardware device

Today I will be writing about creating a Site to Site (S2S) Virtual Private Network from your Azure virtual network to your on-premises network without the need to use a dedicated VPN hardware device.

Requirements:

  • active Azure subscription
  • Azure Resource Group
  • Azure virtual network
  • on-premises VM to install Windows Server 2019
  • proper firewall settings.
  • some networking knowledge

We will start by logging on to https://portal.azure.com.

You can use an existing resource group if you already have networks and VMs in it or create a new resource group.

I will create a new one :

image

After creating the resource group I will go and create a Virtual Network. Go to + Create a resource and search for Virtual Network like below:

image

Then press Create:

image

Give the virtual network a meaningful name, choose the resource group and region in which to deploy, then click Next: IP Addresses

image

Create an IP address space that will be different from your on-premises space:

Create a subnet by pressing Add subnet to which you want your resources (VMs) to connect and to which on premise traffic will be routed.

Define the subnet name and address space:

image

Then press Add:

image

Click on Next: Security:

image

Leave settings as default, and click Review+Create. Make sure Validation passed, then click on Create

image

Wait for the deployment to finish:

image

Click Go to resource:

image

Click Subnets

image

Then click on the + Gateway subnet. You can use the defaults or customize the gateway network (this will be used by the VPN gateway) based on your needs:

image

Click OK and wait for the subnet to be added:

image

The next step is to create the Virtual Network Gateway which is our VPN gateway actually. We will deploy a new one from the Marketplace.

Click on + Create a resource and type in the search box virtual network, then select Virtual Network Gateway:

image 

Then press Create:

image

Select the subscription, the resource group, give it a meaningful name, select the region (make sure it is the same as the virtual network), the Gateway type is VPN and the VPN type is Route Based. Select the SKU based on your bandwidth needs, the Generation and virtual network (the one we just created). Create a new Public IP address as this will be our connection point for the VPN. If you want to create an active-active VPN with BGP you can configured that also ( I will write another article on that). Then click Review + create:

image

Make sure Validation passed, then click on Create

image

Be patient (this will take around 20-30 minutes) and Wait for the deployment to finish:

image

Then click Go to resource

image

Check that is was created and that it has a public IP assigned:

image

The next step is to create a Local Network Gateway. To do this go to + Create a resource and search for local network gateway (this will be the definition for the on premise gateway) and click on it:

image

Click Create

image

Give the Local Network Gateway a meaningful name, your public IP address for your on-premise device or RRAS server, select the on premise address range that you want to route to Azure:

image

Click Create and wait for the deployment to finish:

image

Then click Go to resource

image

The next step is to create the VPN connection. For this we need to go to Connections and click + Add

image

Give it a meaningful name, select the Virtual Network Gateway we created earlier and the Local Network Gateway, add a passphrase for the share key and leave the protocol as IKEv2, then click OK

image

Wait for the connection to get created

image

This finished the Azure part of the configuration.

Now we will need to configure our on premises RRAS server. For this I have created a VM, installed Windows Server 2019 on it and now we will install the needed roles on it, then configure the connection. For the routing to work correctly we will need to give the VM 2 network adapters – 1 connected to the external or DMZ network and the 2nd connected to our internal network.

Below are the configured NICs:

image

Now let’s install the RRAS role. Go to Server manager – Manage – Add Roles and Features. Select Role-Based or feature-based installation.

image

Select the server

image

Select the Remote Access role

image

On features click next, then on the Remote Access click next. On Role Services select DirectAccess and VPN (RAS), then click on Add Features

image

Click Next

image

On the Web Server Role (IIS) click next, same on role services

image

Click Install

image

Wait for the installation to finish.

image

After the installation has finished click Close, then open the Routing and Remote Access console

image

Right Click the server name and then click on Configure and Enable Routing and Remote Access

image

Click Next

image

Select Secure connection between two private networks

image

Select Yes

image

If you have a DHCP server in your environment select Automatically. Else select From a specified range of addresses and define the range. I will select Automatically, then click Next

image

Click Finish and wait for the configuration to finish.

image

On the new wizard for the Demand Dial click next

image

Give the connection a meaningful name and click Next

image

Select Connect using virtual private networking (VPN)

image

For the protocol select IKEv2 (same as we select on the Azure side), click Next

image

Go to the VPN gateway on azure and get the Public IP of the VPN gateway.

image

Enter the Public IP of the gateway

image

Make sure Route IP Packets on this interface is selected and click Next

image

On the Static Router click Add

image

Add the address space you defined on the Azure Virtual Network and on the Subnet you defined for your VMs, add a low metric, then click OK

image

It should look like this, click Next

image

On the credentials page put just Azure, click Next

image

Click Finish

image

After the configuration has been finished expand it then go to Network Interfaces

image

Right click Azure S2S, select Properties

image

Go to Security, select Use preshared key for authentication and add the key that was configured on the Azure VPN gateway, then click OK

image

Right click the connection and select connect

image

And he now have a VPN connection to our Azure VNET

image

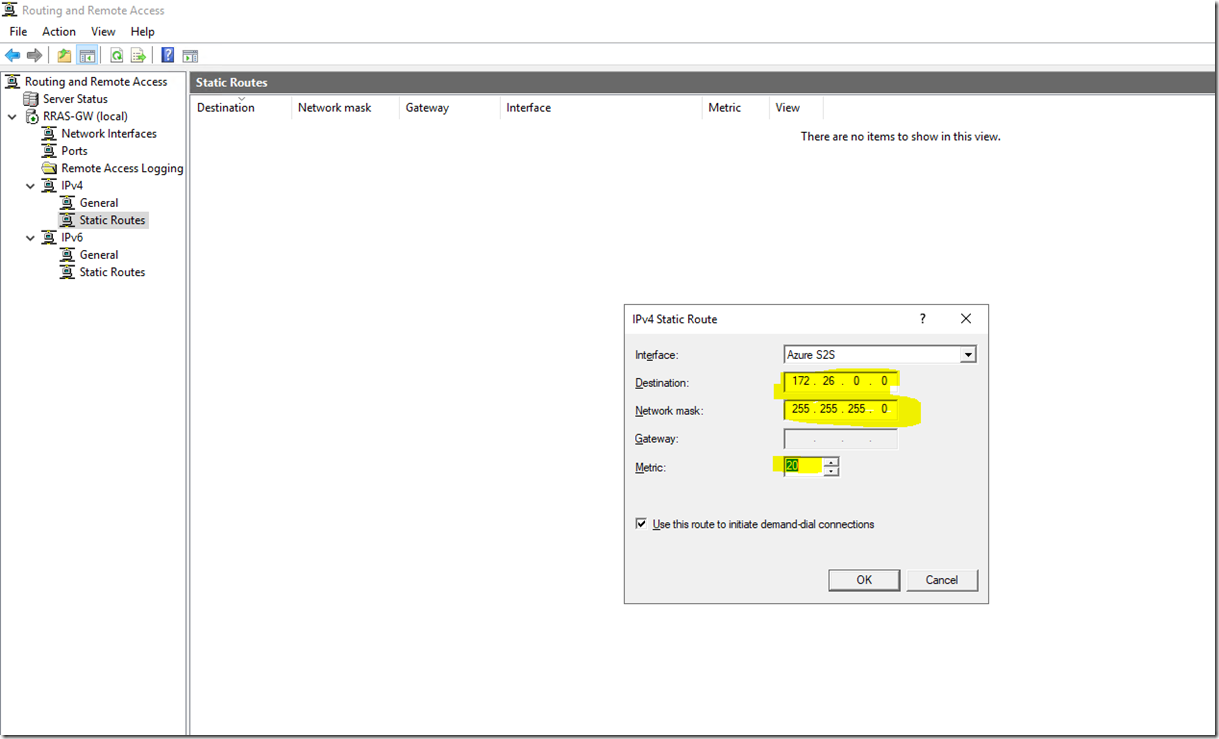
Now we need to add the route to our VNET in the configuration. Go to IPv4, right click Static Routes and select New static route

image

Add the address space of your Azure subnet, selecting a low metric, click OK

image

I have quickly deployed a test VM on my subnet and tried to ping it from my RAS gateway machine:

image

Plus I can now RDP on the internal interface so no need for public RDP:


image

This is how you deploy a site to site VPN from on premise to Azure for without the need for expensive hardware.

Thank you for reading it all up.

In a future article I will show you how to be able to use a VPN with a dynamic IP address with minimal downtime.


System Center Virtual Machine Manager 2019 Update Rollup 1 available

The first update rollup for SCVMM 2019 has been release by Microsoft on February 4th.

This fixes several issues:

  • Unable to add Windows Server 2019 hosts in untrusted domain to SCVMM.
  • Changes to VM network adapter or VM network overwrites associated ACL.
  • Unable to pull LLDP information on pNICs bount to a vSwitch.
  • Long running service template deployments time out after 3 hours. Timeout parameter can now be configured to time above 3 hours using the HKLM\Software\Microsoft\Microsoft System Center Virtual Machine Manager Server\Settings\GuestCommunicatorStatusTimeoutSecs registry key to any desired value.
  • VMM service experiences high memory usage with large number of objects created in tbl_ADHC_HostVolume
  • Unable to assign VM network to VMs on the hosts
  • Automatic Dynamic Optimization fails on clusters in untrusted domain
  • VMM jobs take long time to run whenever there is VMM server fail over to another node. 
  • Storage Provider Refresh fails when the NIC has no MAC present.
  • Unable to create a file share with the same name on different file servers through SCVMM console.
  • Cluster creation fails when VMM service is running under gMSaccount with ‘Access denied’ exception.
  • In addition to these, all the issues fixed in System Center 2016 VMM UR8 and prior URs for VMM 2016 are also fixed in System Center VMM 2019 UR1. 

New Features have been added into SCVMM 2019:

  • Ability to deploy Ubuntu 18.04 VMs
  • Nested virtualization can be enabled via VM templates, service templates and also when creating a new VM from the console
  • Cluster rolling upgrade is now supported for S2D clusters.
  • Deduplication is supported on ReFS volumes for Hyperconverged and SOFS
  • Storage DO (Dynamic Optimization) – helps in preventing cluster shared storage (CSV and file shares) from becoming full due to expansion/new VHDs placed on the cluster shared storage. You can now set a threshold value to trigger a warning when free storage space in the cluster shared storage falls below the threshold, during a new disk placement or auto migration of VHDs to other shared storage in the cluster
  • Support for storage health monitoring
    Storage health monitoring helps you to monitor the health and operational status of storage pool, LUNs, and physical disks in the VMM fabric. You can monitor the storage health in the Fabric page of VMM console.
  • VMM 2019 supports configuration of SLB VIPs while deploying multi-tier application by using the service templates
  • VMM 2019 supports encryption of VM networks. Using the new encrypted networks feature, end-to-end encryption can be easily configured on VM networks by using the network controller (NC). This encryption prevents the traffic between two VMs on the same network and same subnet, from being read and manipulated. The control of encryption is at the subnet level and encryption can be enabled/disabled for each subnet of the VM network.
  • In VMM 2019, you can configure Layer 3 forwarding gateway using the VMM console
  • Support for Static MAC address on VMs deployed on a VMM cloud
    This feature allows you to set static MAC address on VMs deployed on a cloud. You can also change the MAC address from static to dynamic and vice versa for the already deployed VMs.
  • Azure Integration – VM update management through VMM using Azure Automation Subscription. VMM 2019 is introducing the possibility of patching and updating on-prem VMs (managed by VMM) by integrating VMM with Azure automation subscription.
  • New RBAC Role – Virtual Machine Administrator
    In a scenario where enterprises want to create a user role for troubleshooting, it is necessary that the user has access to all the VMs so the user can make any required changes on the VMs to resolve the issue. There is also a need for the user to have access to the fabric to identify the root cause for the issue. However, for security reasons, this user should not be given the privileges to make any changes on the fabric (such as add storage, add hosts etc. The current role-based access control (RBAC) in VMM does not have a role defined for this persona and the existing roles of Delegated Admin and Fabric admin have too little or more than necessary permissions to perform just troubleshooting. To address this issue, VMM 2019 supports a new role called Virtual Machine Administrator. The user of this role has Read and Write access to all VMs but read-only access to the fabric.
  • Group Managed Service Account (gMSA) helps improve the security posture and provides convenience through automatic password management, simplified service principle name (SPN) management, and the ability to delegate the management to other administrators. VMM 2019 supports the use of gMSA for Management server service account.

New features added by Update Rollup 1:

  • Support for management of replicated library shares
    Large enterprises, usually have multi-site datacenter deployments to cater to various offices across globe. These enterprises typically have a locally available library server to access files for VM deployment than accessing the library shares from a remote location. This is to avoid any network related issues one might experience. However, library files need to be consistent across all the datacenters to ensure uniform VM deployments. To maintain uniformity of library contents, organizations use replication technologies. VMM now supports the management of library servers, which are replicated. You can use any replication technologies such as DFSR and manage the replicated shares through VMM.
  • Configuration of DCB settings on S2D clusters
    Remote Direct Memory Access (RDMA) in conjunction with Data Center Bridging (DCB) helps to achieve similar level of performance and losslessness in an Ethernet network as in fiber channel networks. VMM 2019 UR1 supports configuration of data center bridging (DCB) on S2D clusters.

Note

You must configure the DCB settings consistently across all the hosts and the fabric network (switches). A mis-configured DCB setting in any one of the host/fabric device is detrimental to the S2D performance.

  • User experience improvements in logical networks
    In VMM 2019 UR1, user’s experience while creating logical networks has been enhanced. Logical networks are now grouped in product description, based on use-cases. Also, provided illustration for each logical network type and a dependency graph.
  • Additional options to enable nested virtualization
    You can now enable nested virtualization while creating a new VM, deploying VMs through VM templates and service templates. In earlier releases, nested virtualization is supported only on deployed VMs. Learn more about enabling nested virtualization.

System Center Virtual Machine Manager ports and protocols.

Port and protocol exceptions

Connect Port/protocol Details Configure
VMM server to VMM agent on Windows Server-based hosts/remote library server 80: WinRM; 135: RPC; 139: NetBIOS; 445: SMB (over TCP) Used by the VMM agent

Inbound rule on hosts

Can’t modify
VMM server to VMM agent on Windows Server-based hosts/remote library server 443:HTTPS BITS data channel for file transfers

Inbound rule on hosts

Modify in VMM setup
VMM server to VMM agent on Windows Server-based hosts/remote library server 5985:WinRM Control channel

Inbound rule on hosts

Modify in VMM setup
VMM server to VMM agent on Windows Server-based hosts/remote library server 5986:WinRM Control channel (SSL)

Inbound rule on hosts

Can’t modify
VMM server to VMM guest agent (VM data channel) 443:HTTPS BITS data channel for file transfers

Inbound rule on machines running the agent

The VMM guest agent is a special version of the VMM agent. It’s is installed on VMs that are part of a service template, and on Linux VMs (with or without a service template).

Can’t modify
VMM server to VMM guest agent (VM control channel) 5985:WinRM Control channel

Inbound rule on machines running the agent

Can’t modify
VMM host to host 443:HTTPS BITS data channel for file transfers

Inbound rule on hosts and VMM server

Modify in VMM setup
VMM server to VWware ESXi servers/Web Services 22:SFTP

Inbound rule on hosts

Can’t modify
VMM server to load balancer 80:HTTP; 443:HTTPS Channel used for load balancer management Modify in load balancer provider
VMM server to remote SQL Server database 1433:TDS SQL Server listener

Inbound rule on SQL Server

Modify in VMM setup
VMM server to WSUS update servers 80/8530:HTTP; 443/8531:HTTPS Data and control channels

Inbound rule on WSUS server

Can’t modify from VMM
VMM library server to Hyper-V hosts 443:HTTPS BITS data channel for file transfers

Inbound rule on hosts – 443

Modify in VMM setup
VMM console to VMM WCF:8100 (HTTP); WCF:8101 (HTTPS); Net.TCP: 8102 Inbound rule on VMM console machine Modify in VMM setup
VMM server to storage management service WMI Local call
Storage management service to SMI-S provider CIM-XML Provider-specific
VMM server to Baseboard Management Controller (BMC) 443: HTTP (SMASH over WS-Management) Inbound rule on BMC device Modify on BMC device
VMM server to Baseboard Management Controller (BMC) 623: IPMI Inbound rule on BMC device Modify on BMC device
VMM server to Windows PE agent 8101:WCF; 8103:WCF 8101 is used for control channel, 8103 is used for time sync Modify in VMM setup
VMM server to WDS PXE provider 8102: WCF Inbound rule on PXE server
VMM server to Hyper-V host in untrusted/perimeter domain 443:HTTPS (BITS) BITS data channel for file transfers

Inbound rule on VMM server

Library server to Hyper-V host in untrusted/perimeter domain 443:HTTPS BITS data channel for file transfers

Inbound rule on VMM library

VMM server to Windows file server 80: WinRM; 135: RPC; 139: NetBIOS; 445: SMB (over TCP) Used by the VMM agent

Inbound rule on file server

VMM server to Windows file server 443:HTTPS BITS used for file transfer

Inbound rule on file server

VMM server to Windows file server 5985/5986:WinRM Control channel

Inbound rule on file server

For more information read the Microsoft docs here: https://docs.microsoft.com/en-us/system-center/vmm/plan-ports-protocols?view=sc-vmm-2019

Configure network interface order in Windows Server 2016/2019 and Windows 10

I get asked a lot about this: What is the easiest way to configure network interface order?

The simplest way is to use the network metric in order to be able to actually configure this order.
The order in which adapters appear in a list is determined by the IPv4 or IPv6 interface metric.
When network traffic routes are chosen and you have configured the InterfaceMetric parameter of the Set-NetIPInterface command, the overall metric that is used to determine the interface preference is the sum of the route metric and the interface metric. The interface metric gives preference to a particular interface, such as using wired if both wired and wireless are available.

In order to do this we can use powershell:

Get-NetIPInterface

If you need to decrease the priority of a network interface set the metric for it to a very large number like 5000 or similar.

Set-NetIPInterface -InterfaceIndex 7 -InterfaceMetric 1000
Get-NetIPInterface

“Watch” command in Windows

These days I needed to be able to check on the execution of a repetitive task. If I would use linux I could use the watch command but I am a Windows guy.

So I came up with an alternative – I created a bat file with the below content:

@ECHO OFF
:loop
  cls
  %*
  timeout /t 5
goto loop

To change the duration of the loop change the timeout /t 5 value (now it is 5 seconds).

Usage is similar to linux: watch dir *.jpg

Finding the WSUS server from which updates are downloaded

Open an administrative command prompt and type:

 Reg query „HKLM\SOFTWARE\Policies\Microsoft\Windows\WindowsUpdate” /s |findstr „WUServer”

The result is something like below:

WUServer REG_SZ http://wsusservername.domain.com
UseWUServer REG_DWORD 0x1

Done!